
Adult Braces: No Longer Awkward!
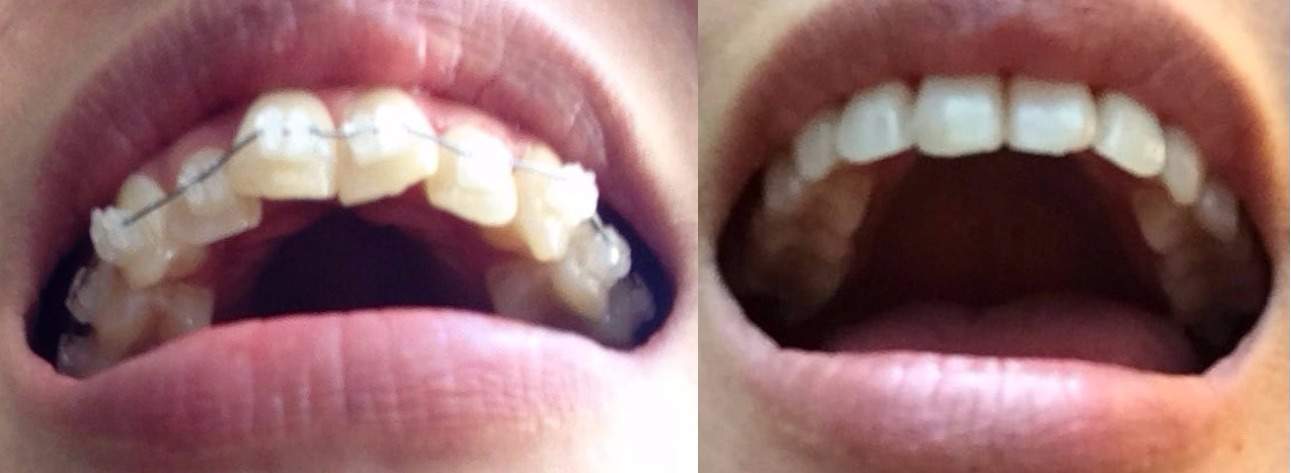
If you’re considering adult braces, I say from firsthand experience that it’s worth it. I’ve had braces twice in my life: from age 15-17, and 35-37. As a teenager, I wore the retainer as instructed for a few years, but I fell out of the habit during college. Over the next 18 years, my teeth reverted to their original crowded state. I became increasingly unhappy with my smile, and after much research, I decided to get braces again. Even though the treatment was a HUGE hassle, I’m glad I did it. You can see how crowded my teeth used to be, and now I love my smile.
I’ll describe how I reached my decision, the two-year process of having braces, and how I saved over $2,000 on the treatment:
Braces Research
Here’s an overview of the types of braces, ordered from least to most visible (and correspondingly, the most to least expensive). I’m going off my memory for the prices for everything but ceramic brackets, so speak with your orthodontist to get a firm estimate. These are San Francisco prices, so if you’re not in the Bay Area, the quoted price may be lower:
| Type of braces | Notes |
| Invisalign | $10,000. Too pricey for my budget. Worried about increased cavity risk. Also worried about the temptation to not wear the trays as directed (vs. traditional braces where the brackets are glued to your teeth). |
| Lingual | $9,000. Brackets glued to the inner part of your teeth. Too expensive for me. Worried about having a constant lisp. |
| Ceramic brackets | $6,000. Tooth-colored brackets glued to the front of your teeth. What I selected. |
| Metal brackets | $5,000. The cheapest option. Worried about metal mouth. |
I chose ceramic brackets since they’re less obvious than metal brackets, and much cheaper than Invisalign and lingual braces. The average treatment time for adults is two years, and I didn’t want to have metal mouth for that long!
The Two-Year Process
Here is my timeline of braces treatment:
| Dates | Notes |
| March 2015 | Free consultation with the orthodontist for estimated treatment time (they said 24 months, which was accurate) and an overview of treatment options and costs. |
| April 2015 | Two appointments: one to take an x-ray (note: this was an additional $250) and glue the brackets and install spacers (60 minutes; the spacers were painful*), and another to install the wires (30 minutes). |
| April 2015-March 2017 | Regular check-ups every six weeks to change to an increasingly thick wire. During this period, I also had to wear rubber bands of increasing thickness for about nine months to close my bite (24/7 for six months, nightly for three months). |
| April-October 2017 | Retainers for six months 24/7, then nightly for the rest of my life. |
*Word of warning for those with crowded teeth and large molars: the spacers were the worst. The orthodontist wanted to place metal bands around the last molars to serve as an anchor for the wires, but they needed to create space first. After jamming plastic clips between my teeth and living with the discomfort for one week, it was all for nothing because they STILL couldn’t fit the bands around my gigantic molars.
The three main bummers about having braces as an adult are:
- You must change your diet, which will be difficult if you have a sweet tooth: no hard foods (hard candies, toffee), no sticky foods (chewing gum), and no soda pop (because you’re at greater risk for cavities with braces). I had to cut apples and peaches into thin slices for two years because biting into fruit risked loosening the brackets and extending the treatment time.
- It can be painful: when the orthodontist switched to thicker wires, my gums were sore for a day or two. The soreness from the rubber bands was worse. Tip: take an Advil an hour before the appointment, which will help a lot.
- Maintenance is annoying: I was constantly brushing my teeth after all meals and snacks. And flossing took forever because I had to thread the floss between the brackets tooth by tooth.
Money-saving Tips
I mentioned that my San Francisco orthodontist charged $6,000 for ceramic braces, plus $250 for the panoramic x-ray. Here’s what I did to save over two thousand dollars and set up a payment plan:
- I asked them to waive the x-ray fee: $250 savings.
- I used my Health Savings Account to use pre-tax money to pay for treatment. I contributed the $6,000 cost over two years. If you’re in the 25% federal tax bracket, you’ve saved $1,500 in taxes. And if your state has income taxes, then you’ll save even more; for Californians in the 9.3% state tax bracket, that’s an additional $560 savings. If you don’t have an HSA (which is associated with high-deductible health plans), see if your company offers an FSA (Flex Spending Account), which operates similarly to an HSA.
- Finally, I set up a payment plan by opening a CareCredit card, which allowed me to pay off the $6,000 over 24 monthly installments at 0% interest. I paid the CareCredit balance every month from my bank account, and reimbursed myself from the HSA account. Note: individual orthodontists negotiate terms with CareCredit, so make sure the repayment term is at least 24 months.
Check to see if you have a dental school in your area to save even more on treatment costs. A dental student works under the supervision of the professor. The downside is that the clinic hours may be limited. In the Bay Area, UCSF and the University of Pacific have dental programs.

One of my favorite scenes from the Simpsons. Lisa needs braces, and Homer is negotiating a dental plan for the nuclear power plant’s union.
Side note for braces for children:
- Invisalign: may be an attractive option for self-conscious teenagers, but you have to trust your child to actually wear the Invisalign trays.
- Dental insurance: if you have it, policies tend to provide benefits only for children. I typically see policies pay $1,000. This won’t fund the treatment in full, but it’s better than nothing.
So that was my experience with adult braces. Feel free to leave questions in the comments section!

